☁ Deploy to Kubernetes in Google Cloud: Challenge Lab | logbook
In this article, we will go through the lab GSP318 Deploy to Kubernetes in Google Cloud: Challenge Lab, which is an expert-level exercise (formerly known as Kubernetes in Google Cloud: Challenge Lab) on Qwiklabs. You will practice the skills and knowledge for configuring Docker images and containers and deploying fully-fledged Kubernetes Engine applications.
The challenge contains 4 required tasks:
- Create a Docker image and store the Dockerfile
- Test the created Docker image
- Push the Docker image in the Google Container Repository
- Create and expose a deployment in Kubernetes
- Increase the replicas from 1 to 3
- Update the deployment with a new version of valkyrie-app
- Create a pipeline in Jenkins to deploy your app
Task 1: Create a Docker image and store the Dockerfile
Hint: Refer procedures and modify the codes in the lab GSP055 Introduction to Docker
-
First of all, you have to run the following command in Cloud Shell.
source <(gsutil cat gs://cloud-training/gsp318/marking/setup_marking.sh)It installs the marking scripts, which use to check your progress.
-
Then, run the commands below to clone the valkyrie-app source code repository to the Cloud Shell. (Remember to replace
YOUR_PROJECT_IDwith your Project ID)export PROJECT=$YOUR_PROJECT_ID gcloud source repos clone valkyrie-app --project=$PROJECT -
Create a
Dockerfileunder thevalkyrie-appdirectory and add the configuration to the file. Copy the given codes from the lab page to the following snippet, and then run the commands in the Cloud Shell.cd valkyrie-app cat > Dockerfile <<EOF // COPY TO HERE EOF -
Build the image with the following command:
docker build -t valkyrie-app:v0.0.1 . -
Run
docker imagesto look at the images you built.Before clicking Check my progress on the lab page, don’t forget to run the following commands to execute the marking script:
cd ~/marking
./step1.sh
Task 2: Test the created Docker image
Hint: Refer procedures and modify the codes in the lab GSP055 Introduction to Docker
The lab instruction requires you to run the docker image built in Task 1 and show the running application by Web Preview on port 8080. Based on the requirements, the docker command will be:
docker run -p 8080:8080 --name valkyrie-app valkyrie-app:v0.0.1 &
-
In the Cloud Shell, go back to the
valkyrie-appdirectory, and run the above command. -
Click Web Preview to see the running app.
-
After that, open a new Cloud Shell to run the
step2.shmarking script.cd ~/marking ./step2.sh

Task 3: Push the Docker image in the Container Repository
Hint: Refer procedures and modify the codes in the lab GSP055 Introduction to Docker
In this task, you will push the Docker image valkyrie-app:v0.0.1 into the Container Registry with a tag gcr.io/YOUR_PROJECT_ID/valkyrie-app:v0.0.1.
Thus, you should format the docker commands as below.
docker tag valkyrie-app:v0.0.1 gcr.io/$PROJECT/valkyrie-app:v0.0.1
docker images
docker push gcr.io/$PROJECT/valkyrie-app:v0.0.1
After pushing the container, the valkyrie-app repository will appear in the Cloud Console as shown in the image below.

Task 4: Create and expose a deployment in Kubernetes
Hint: Refer procedures in the labs GSP100 Kubernetes Engine: Qwik Start and GSP021 Orchestrating the Cloud with Kubernetes for steps 1-2 and steps 3-4, respectively.
-
In the Cloud Shell, go to the
valkyrie-app/k8ssubdirectory. -
Get authentication credentials for the cluster
gcloud container clusters get-credentials valkyrie-dev --region us-east -
Use a text editor to modify
deployment.yamland replaceIMAGE_HEREwithgcr.io/YOUR_PROJECT_ID/valkyrie-app:v0.0.1 -
Use
kubectl create -f <filename>command to deploy deployment.yaml and service.yaml
Task 5: Update the deployment with a new version of valkyrie-app
Hint: Refer the skills in lab GSP053 Managing Deployments Using Kubernetes Engine or my previous article Qwiklabs/Logbook: Scale Out and Update a Containerized Application on a Kubernetes Cluster
Step 5-1 Increase the replicas from 1 to 3
kubectl scale deployment valkyrie-dev --replicas 3
Step 5-2 Update the deployment with a new version of valkyrie-app
-
Go back to the
valkyrie-appdirectory in the Cloud Shell. -
Merge the branch called
kurt-devinto master using the followinggitcommand:git merge origin/kurt-dev -
Build and push the new version with tagged v0.0.2:
docker build -t valkyrie-app:v0.0.2 . docker tag valkyrie-app:v0.0.2 gcr.io/$PROJECT/valkyrie-app:v0.0.2 docker images docker push gcr.io/$PROJECT/valkyrie-app:v0.0.2 -
Trigger a rolling update by running the following command:
kubectl edit deployment valkyrie-devChange the image tags from
v0.0.1tov0.0.2for both the backend and frontend, then save and exit.Tips: If you change the text mode editor from Vim to Nano by
KUBE_EDITOR="nano"before the kubectl edit command.Tips: Instead of
kubectl edit, you can update images for the deployment by running the following:kubectl set image deployment valkyrie-dev backend=gcr.io/$PROJECT_ID/valkyrie-app:v0.0.2 frontend=gcr.io/$PROJECT_ID/valkyrie-app:v0.0.2
Task 6: Create a pipeline in Jenkins to deploy your app
Hint: Refer procedures in the labs GSP051 Continuous Delivery with Jenkins in Kubernetes Engine
In this task, you will need to:
- Connect to Jenkins
- Adding your service account credentials
- Creating a Jenkins job
- Modifying the pipeline definition
- Modify the site
- Kick off Deployment
6.1 To connect the Jenkins
-
Get the password with the following command:
printf $(kubectl get secret cd-jenkins -o jsonpath="{.data.jenkins-admin-password}" | base64 --decode);echo -
Connect to the Jenkins console using the commands below:
export POD_NAME=$(kubectl get pods --namespace default -l "app.kubernetes.io/component=jenkins-master" -l "app.kubernetes.io/instance=cd" -o jsonpath="{.items[0].metadata.name}")
kubectl port-forward $POD_NAME 8080:8080 >> /dev/null &
If there is another running container, use the
dockercommands below to kill it:docker ps docker container kill $(docker ps -aq) -
Click on the Web Preview button in cloud shell, then click “Preview on port 8080” to connect to the Jenkins console.
Username: admin
6.2 Adding your service account credentials
-
In the Jenkins user interface, click Credentials in the left navigation.
-
Click Jenkins
-
Click Global credentials (unrestricted).
-
Click Add Credentials in the left navigation.
-
Select Google Service Account from metadata from the Kind drop-down and click OK.
6.3 Creating the Jenkins job
Create a pipeline job that points to your */master branch on your source code.
-
Click Jenkins > New Item in the left navigation:
-
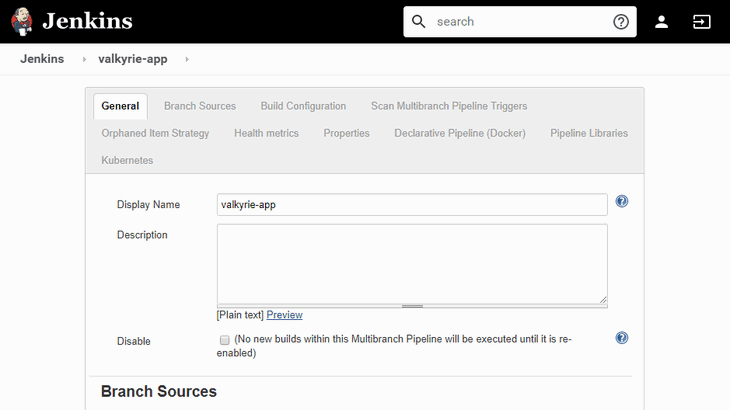
Name the project valkyrie-app, then choose the Multibranch Pipeline option and click OK.
-
On the next page, in the Branch Sources section, click Add Source and select git.
-
Paste the HTTPS clone URL of your sample-app repo in Cloud Source Repositories
https://source.developers.google.com/p/YOUR_PROJECT_ID/r/valkyrie-appinto the Project Repository field. Remember to replace YOUR_PROJECT_ID with your GCP Project ID. -
From the Credentials drop-down, select the name of the credentials you created when adding your service account in the previous steps.
-
Under the Scan Multibranch Pipeline Triggers section, check the Periodically if not otherwise run box and set the Interval value to 1 minute.
-
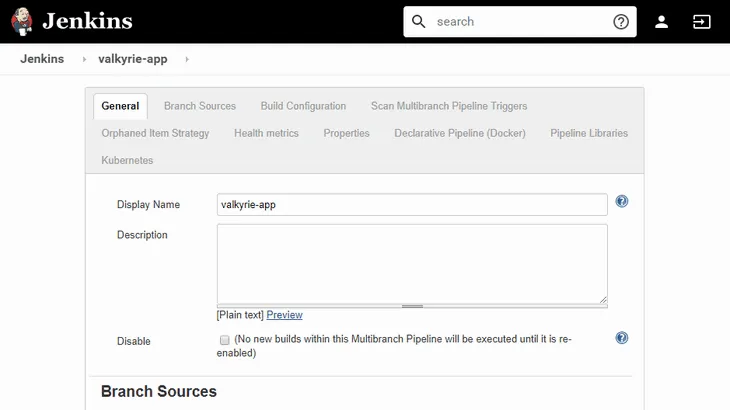
Your job configuration should look like this:

6.4 Modifying the pipeline definition
Open Jenkinsfile file in a text editor, and replace YOUR_PROJECT with your GCP project ID.
6.5 Modify the site
Open source/html.go file in a text editor, and change the color of headings from green to orange.
6.6 Kick off Deployment
Commit and push the changes:
git config --global user.email $PROJECT
git config --global user.name $PROJECT

git add *
git commit -m 'green to orange'
git push origin master
Finally, manually trigger the build in the Jenkins console


Congratulations! You completed this challenge lab.
Demonstration Video
This browser does not support the YouTube video player. Watch on YouTube
⏱Timestamps:
0:00 Start Lab & Overview
1:18 Task 1: Create a Docker image and store the Dockerfile
3:29 Task 2: Test the created Docker image
4:01 Task 3: Push the Docker image in the Container Repository
4:54 Task 4: Create and expose a deployment in Kubernetes
6:55 Task 5: Update the deployment with a new version of valkyrie-app
9:20 Task 6: Create a pipeline in Jenkins to deploy your app
Summary
Do you feel this challenge lab quite difficult? You might if you don’t get enough practice on Kubernetes Engines. Other than that, you might be disturbed if you don’t know how to use the docker command to kill a container and the git config command before committing the changes. Despite this, most tasks reproduce based on the contents from the labs in the Kubernetes in Google Cloud quest. There is nothing to be afraid of.
See Also:
