☁ Automate Interactions with Contact Center AI: Challenge Lab | logbook
In this article, we will go through the lab GSP311 Automate Interactions with Contact Center AI: Challenge Lab, which is an expert-level exercise on Qwiklabs. You will practice the skills and knowledge to deploy Cloud Dataflow Pipeline to transcript audio files and store the data to BigQuery. You will also need to implement Data Loss Prevention API for redacting the sensitive data from the audio transcriptions (such as name, email, phone number, and SSN).
The challenge contains 8 required tasks:
- Create a Regional Cloud Storage bucket
- Create a Cloud Function
- Create a BigQuery dataset
- Create a Pub/Sub topic
- Create a Regional Cloud Storage bucket with DFaudio folder
- Deploy Dataflow pipeline
- Process the sample audio files
- Run a Data Loss Prevention Job
Setting up the environment
First of all, open the Cloud Shell to clone the Speech Analysis Framework source repository:
git clone https://github.com/GoogleCloudPlatform/dataflow-contact-center-speech-analysis.git
Task 1: Create a Cloud Storage Bucket
Make sure you:
- create the bucket in the region
us-central1
Task 2: Create a Cloud Function
Make sure you:
- change the Trigger to Cloud Storage and select Finalize as the Event Type
- In the Cloud Console, navigate to Cloud Functions.
- Create a new function called
saf-longrun-job-func. - Select Cloud Storage from the dropdown for the Trigger setting.
- In the Event Type dropdown, select Finalize/Create.
-
Click on the BROWSE button, and choose the bucket created in Task 1.
- Select the Runtime to be
Node.js 8 - Open the source repository in a new window.
- Replace the INDEX.JS AND PACKAGE.JSON in the Cloud Function with the source codes from the repository.
- Type
safLongRunJobFuncin the Function to execute. - Click on ENVIRONMENT VARIABLES, NETWORKING, TIMEOUTS AND MORE, ensure the region is configured to
us-central1under the Advanced options. - Click CREATE.

Task 3: Create a BigQuery Dataset
- Navigate to BigQuery, click on CREATE DATASET.
- Assign a Dataset ID, e.g.
lab. - Click Create dataset.
Task 4: Create Cloud Pub/Sub Topic
- Navigate to Pub/Sub > Topics, click on CREATE TOPIC.
- Assign a Topic ID, e.g.
speech2text. - Click Create Topic.
Task 5: Create a Cloud Storage Bucket for Staging Contents
- Navigate to Cloud Storage, click on the bucket created in Task 1.
- Create a folder called
DFaudioin the bucket.
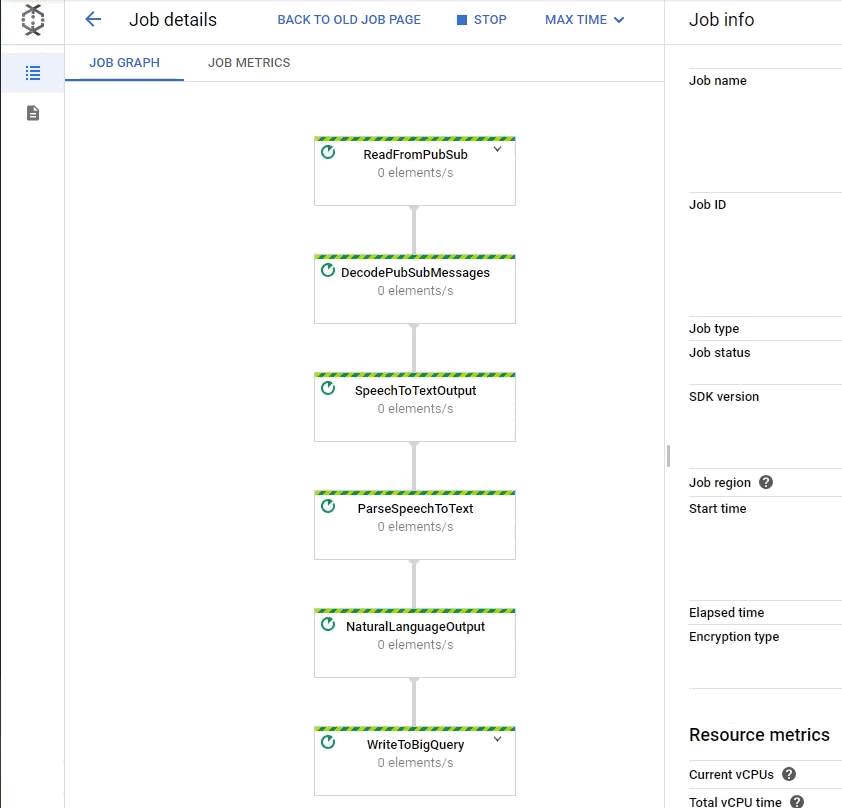
Task 6: Deploy a Cloud Dataflow Pipeline
In the Cloud Shell, run the following commands to deploy the Dataflow pipeline
cd dataflow-contact-center-speech-analysis/saf-longrun-job-dataflow

python -m virtualenv env -p python3
source env/bin/activate
pip install apache-beam[gcp]
pip install dateparser

export PROJECT_ID=[YOUR_PROJECT_ID]
export TOPIC_NAME=speech2text
export BUCKET_NAME=[YOUR_BUCKET_NAME]
export DATASET_NAME=lab
export TABLE_NAME=transcript

python3 saflongrunjobdataflow.py --project=$PROJECT_ID --input_topic=projects/$PROJECT_ID/topics/$TOPIC_NAME --runner=DataflowRunner --region=us-central1 --temp_location=gs://$BUCKET_NAME/tmp --output_bigquery=$DATASET_NAME.$TABLE_NAME --requirements_file="requirements.txt"

Task 7: Upload Sample Audio Files for Processing
In the Cloud Shell, run the following commands to upload the sample audio files into your Audio Uploads Bucket:
# mono flac audio sample
gsutil -h x-goog-meta-callid:1234567 -h x-goog-meta-stereo:false -h x-goog-meta-pubsubtopicname:$TOPIC_NAME -h x-goog-meta-year:2019 -h x-goog-meta-month:11 -h x-goog-meta-day:06 -h x-goog-meta-starttime:1116 cp gs://qwiklabs-bucket-gsp311/speech_commercial_mono.flac gs://$BUCKET_NAME

# stereo wav audio sample
gsutil -h x-goog-meta-callid:1234567 -h x-goog-meta-stereo:true -h x-goog-meta-pubsubtopicname:$TOPIC_NAME -h x-goog-meta-year:2019 -h x-goog-meta-month:11 -h x-goog-meta-day:06 -h x-goog-meta-starttime:1116 cp gs://qwiklabs-bucket-gsp311/speech_commercial_stereo.wav gs://$BUCKET_NAME
Q: What is the TOP named entity in the 5 audio files processed by the pipeline? A: pair

Task 8: Run a Data Loss Prevention Job
You must make a copy of your BigQuery table before running a Data Loss Prevention Job
- Navigate to BigQuery in the Cloud Console
- Select the table generated by the Dataflow pipeline.
- Click on More > Query settings.
-
Assign a Table name, e.g.
copied, then click Save. -
Run the following SQL query:
SELECT * FROM `[YOUR_PROJECT_ID].[DATASET_NAME].[TABLE]` - Select the copied table, then click on EXPORT > Scan with DLP.
- In the Create job or job trigger pane, assign a Job ID and then click CREATE.
- Click CONFIRM CREATE.

Congratulations! You completed this challenge lab.
Summary
Tasks 1 to 5 were pretty straightforward. If you prefer using the command line to create the resources, please refer to the README file of the Speech Analysis Framework in the GitHub repository. You can also find the commands to deploy the saflongrunjobdataflow.py Python script in Task 6 and the SQL query for getting the answer in Task 7.
Only Task 7 was a little tricky. You will get stuck if you try to make a copy of the table using the COPY TABLE button in the BigQuery console. It can copy the table structure but cannot copy the data in the table. Once you know how to correctly clone the table, the task is just a piece of cake.
Demonstration Video
This browser does not support the YouTube video player. Watch on YouTube
⏱Timestamps:
00:00 Lab start
00:59 Task1: Create a Cloud Storage Bucket
01:58 Task2: Create a Cloud Function
04:07 Task3: Create a BigQuery Dataset
05:00 Task4: Create Cloud Pub/Sub Topic
05:52 Task5: Create a Cloud Storage Bucket for Staging Contents
06:21 Task6: Deploy a Cloud Dataflow Pipeline
13:36 Task7: Upload Sample Audio Files for Processing
17:05 Task8: Run a Data Loss Prevention Job
Keep on reading:
