☁ Migrate a MySQL Database to Google Cloud SQL | logbook

This is the last article of the series about the Qwiklabs quest “Challenge: GCP Architecture”. Compared to the previous labs, this one is more practical and also valuable for non-developers. We will touch a WordPress site in the lab GSP306 “Migrate a MySQL Database to Google Cloud SQL“ this time. It is useful if you are going to move or integrate your applications with flexible and scalable Cloud SQL service.
An existing WordPress installation in the Compute Instance called blog, is already running in the lab. The blog is connecting with a MySQL database running on the same server. You need to migrate the local database to Google Cloud SQL and reconfigure WordPress to access the Cloud database instead.
Brief Introduction of Challenge Scenario
When you open the page of this lab on Qwiklabs, you can find the task requirements by click the green activity tracker (on the top right of the page) to expand the score box.

The screenshot above shows that there are 5 steps required for completing this lab. Combining with the instruction details, they are translated to the following mission statements.
- Create a Cloud SQL instance
- Export and import the
wordpressdatabase to the Cloud SQL instance - Authorize the VM instance
blogto access the Cloud SQL - Change
wp-config.phppoints to the Cloud SQL instance - Check that the blog still responds to requests

Check Existing WordPress Resources
On the lab page, there is the IP of the Demo Blog Site shown in the left panel after provisioning lab resources.

In the web console, navigate to Compute Engine > VM instances. You should find a VM instance called blog has been provisioned. A WordPress server is running on this instance.

The instance should have the same external IP as shown in the panel. Copy the external IP and open it in a new tab. A website called Blog-Demo will be displayed.
Create Cloud SQL Instance
Next, you need to create a new Google Cloud SQL instance to host the migrated database.
In the web console, navigate to SQL and click Create instance. Choose MySQL, give a name to the SQL instance, e.g. demo. Generate a root password and then click Create.

Wait for the instance to be initialized, the process usually takes 5 to 10 minutes.

You can continue the procedure below without waiting here.
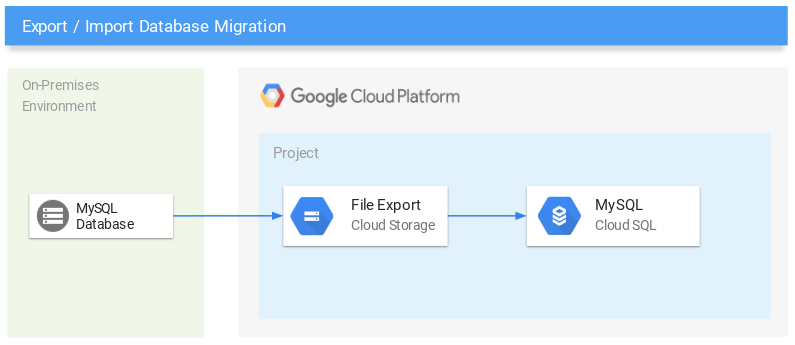
Export SQL Database
If you read “Migration from MySQL to Cloud SQL in the documentation of Google Cloud Solutions. There are two ways to migrate the database, namely, (a) Export/import approach or (b) External replica promotion approach.
- Export/import migration This method requires exporting the entire source database and import the dump data to replica, which typically requires downtime for the database during the entire process to keep data in sync.
- External replica promotion migration This method process through the automated migration workflow provided by Google Cloud SQL, which aims to minimize the database uptime by promoting the replica database to replace the source after the data is synchronized.
In a production environment, you may consider the automated workflow to take its benefits. In this article, I will only show you the export/import approach because it is simpler. I want to make sure you can accomplish this challenge lab.
In the web console, navigate to Compute Engine > VM instances and click the SSH button of the instance called blog.
Both WordPress and its MySQL database are running in this VM instance. The existing MySQL database is called wordpress and the user called blogadmin with password Password1*.
In the SSH session, use mysqldump to export the MySQL database to a dump file with the following flags:
mysqldump \
--databases [DATABASE_NAME1, DATABASE_NAME2, ...] -h [INSTANCE_IP] -u [USERNAME] -p \
--hex-blob --skip-triggers --single-transaction --ignore-table [VIEW_NAME1] [...] \
--default-character-set=utf8mb4 > [SQL_FILE].sql
In this lab, you can remove the --ignore-table [VIEW_NAME1] flag because the database does not include any views. Replace the argument values, the command line should look like:
mysqldump --databases wordpress -h localhost -u blogadmin -p \
--hex-blob --skip-triggers --single-transaction \
--default-character-set=utf8mb4 > wordpress.sql
Now you need to copy the dump file to Cloud Storage. Use the following commands to create a bucket and upload the file to it.
export PROJECT_ID=$(gcloud info --format='value(config.project)')
gsutil mb gs://${PROJECT_ID}
gsutil cp ~/wordpress.sql gs://${PROJECT_ID}
In the web console, navigate to Storage to confirm the uploaded file.

Import to Cloud SQL
Go back to the web console, navigate to SQL to check whether the cloud SQL instance is ready. Once the instance is online, click the instance name to view the details.
Choose DATABASES tab, and click Create database.
In the dialog, enter wordpress as the name and select utf8mb4 as the character set.

Now you prepared an empty database called wordpress in the Cloud SQL. Click IMPORT button at the top of the page.
In the dialog, click Browse to select the dump file in the Cloud Storage, and select wordpress in the Database field.

Click Import to start the process.
Authorized Blog Instance to Access Cloud SQL
While the database is importing to the cloud SQL, choose USERS tab and click Create user account.
In the dialog, enter blogadmin as the user name and Password1* as the password.

Choose CONNECTIONS tab, under the Public IP click Add network.
Copy the IP of the Demo Blog site to the Network field, and format the number in form of a CIDR notation X.X.X.0/24.

Click Done and Save to authorize the VM instance blog to access the Cloud SQL.
Reconfigure WordPress to connect the Cloud SQL instance
For this lab, the WordPress site configuration file is located in the /var/www/html/wordpress/ directory. Use the following commands to change the current directory and list the files,
cd /var/www/html/wordpress/
ls
You should find a file called wp-config.php.

(Optional) Before changing the WordPress configuration, I recommend you stop the local MySQL server using the following commands in the SSH session:
sudo service mysql stop
sudo service mysql status
Refresh the Demo Blog Site, the website becomes fail to render.

Now you edit the WordPress configuration, such that it points to the Cloud SQL instance.
Open the wp-config.php, such as using nano editor”
sudo nano wp-config.php
The file looks like below,

Find the following lines in the file,
/** MySQL hostname */
define('DB_HOST', 'localhost');
Replace localhost with the Public IP of the Cloud SQL instance, e.g,
/** MySQL hostname */
define('DB_HOST', '35.226.248.101');
Press Ctrl + x and type Y to save and exit the file.
If you refresh the website in your web browser, it should be restored. That means the WordPress site is connected to Cloud SQL. Otherwise, use the following command to restart the webserver,
sudo service apache2 restart
sudo service apache2 status
(Optional) Test the website to check if any issues after migration.

Congratulations! You should accomplish the lab if you follow the above steps. Also, you earned a badge if you completed the quest “Cloud Architecture: Design, Implement, and Manage“. You become a cloud expert now!
This post has also been published to Medium. If you like to read and take notes in Medium, please visit Medium (@chriskyfung).
Next time, I will try to write a review about different quests on Qwiklabs. See you soon!
Keep on reading:
- Learning Google Cloud Platform on Qwiklabs: Learning Map, Assistive Tool and Tips
- ☁ Set up and Configure a Cloud Environment in Google Cloud: Challenge Lab | logbook
Useful external link:
