☁ Scale Out and Update a Containerized Application on a Kubernetes Cluster | logbook
In the last lab, you built a docker image and created a Kubernetes cluster for a containerized application, called echo-app. Considering your developer team delivers a new version of the application to you, so you need to update the running application on the cluster to the new version. You may also need to scale the cluster size to optimize the usage and performance. You will do this in the lab GSP305 “Scale Out and Update a Containerized Application on a Kubernetes Cluster“. This lab will perform provisioning of the application echo-app:v1 as the same as in the previous lab. You will continue practicing with the echo-app application in the echo-web deployment, and update its version from v1 to v2.
Brief Introduction of Challenge Scenario
When you open the page of this lab on Qwiklabs, you can find the task requirements by click the green activity tracker (on the top right of the page) to expand the score box.

The screenshot above shows that there are 4 steps required for completing this lab. Combining with the instruction details, they are translated to the following mission statements.
- Update a docker application and push a new version of the image tagged
echo-app:v2to a container repository (gcr.io). - Upload the deployment running on the Kubernetes cluster to
echo-app:v2. - Scale out the application so that the Kubernetes cluster deployment is running 2 replicas.
- The application must respond to web requests with V2.0.0.
Build a Docker Image of Sample Application with a v2 tag
Just similar to the steps in the last lab, you can start with the pre-uploaded archive that contains the sample application and the docker configuration in the Cloud Storage bucket. Use a gsutil cp command to copy the archive from the Cloud Storage to the Cloud Shell environment. Next, use a tar -xvzf command to unzip the files. You may use a code editor to compare the change between the v1 and v2 codes. After that, use docker commands to build, tag, and push the new container image to Google Container Registry (gcr.io). If you do not remember how to build a docker image on GCP, I recommend you revise the lab “Introduction to Docker“ before you start.
Edit the line in the /manifests/echoweb-deployment.yaml file defining which image to use:
apiVersion: apps/v1beta1
kind: Deployment
metadata:
  name: echoweb
  labels:
    app: echo
spec:
  template:
    metadata:
      labels:
        app: echo
        tier: web
    spec:
      containers:
      - name: echo-app
        image: gcr.io/PROJECT_ID/echo-app:v2 # Update this to v2.
                                             # Replace PROJECT_ID
                                             # with your project
        ports:
        - containerPort: 8000
Save the file.
Build a new docker image of the sample application with a tag called v2, and push the image to Google Container Registry,
docker build -t echo-app:v2 .
export PROJECT_ID=$(gcloud info --format='value(config.project)')
docker tag echo-app:v2 gcr.io/${PROJECT_ID}/echo-app:v2
docker push gcr.io/${PROJECT_ID}/echo-app:v2
In the web console, navigate to Container Registry > Images to confirm the docker image tagged v2 has been pushed to the cloud repositories.

Next, you need to update the application to the Kubernetes Cluster.
Update the Application to the Kubernetes Cluster Using Web Console
Navigate to Kubernetes Engine > Workloads, click the name echo-web to show the Deployment details. Press the icon to expand the menu and select Rolling Update.

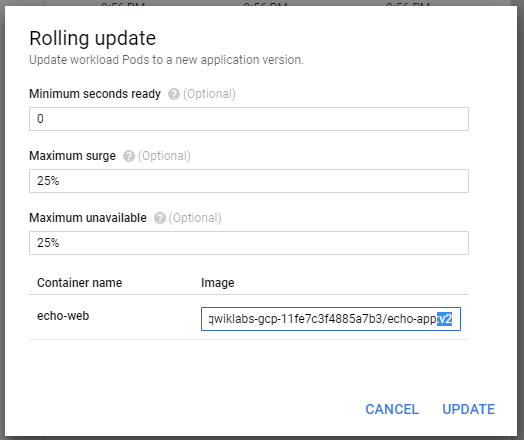
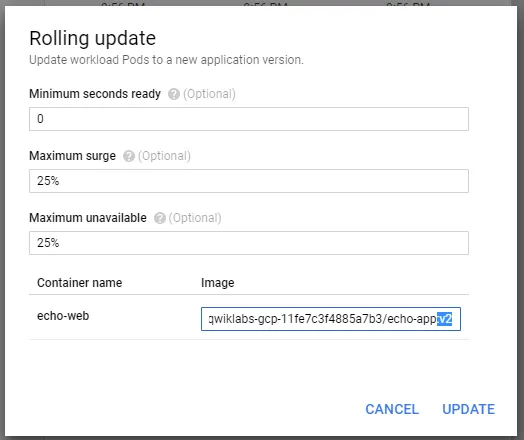
In the Rolling Update dialog, modify the end of the image field from v1 to v2.

Click UPDATE.
Scale out the application so that the Kubernetes cluster deployment
In this article, I will show you the method of using the GCP web console. If you prefer to use command-line tools, you can refer to the lab GSP053 “Managing Deployments Using Kubernetes Engine“ on Qwiklabs.
Navigate to Kubernetes Engine > Workloads, click the name echo-web to show the Deployment details. Press the icon to expand the menu and select Scale.

In the Scale dialog, type 2 to the field Replicas,

Click SCALE, then wait for creating/deleting instances until 2 replicas exist in the Kubernetes cluster.
Open the IP address of the external endpoint, you should see a similar web response:

Congratulations! You should accomplish the lab if you follow the above steps.
This post has also been published to Medium. If you like to read and take notes in Medium, please visit Medium (@chriskyfung).
Do you feel this lab difficult for you? Next lab will be even more challenging, but do not stop here. That is the final lab of the quest. You can earn a badge very soon!
See Also: Learning Google Cloud Platform on Qwiklabs: Learning Map, Assistive Tool and Tips
