☁ Ensure Access & Identity in Google Cloud: Challenge Lab | logbook
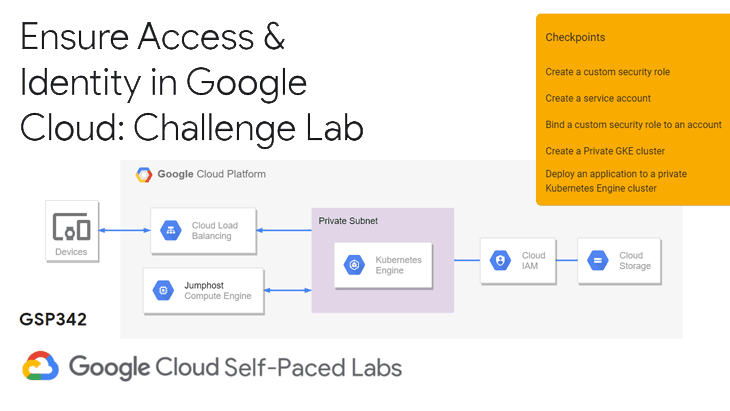

In this article, we will go through the lab GSP342 Ensure Access & Identity in Google Cloud: Challenge Lab, which is an advanced-level exercise on Qwiklabs. You will practice the following topics:
- Create a custom security role.
- Create a service account.
- Bind IAM security roles to a service account.
- Create a private Kubernetes Engine cluster in a custom subnet.
- Deploy an application to a private Kubernetes Engine cluster.
Task 0: Prep
Before stepping inside the main tasks, I suggest you conduct the following preparations.
🔍 Inspect provisioned resources
- In the Cloud Console, navigate to Compute Engine > VM instances.
- Click the name of the instance called
orca-jumphostto view the detail page. - Scroll to the Network interfaces section, click on the network called
orca-build-vpc. - Find out the region of the
orca-build-vpcsubnet.
📍 Set a zone
In the example video, the lab provision created the subnet to the region us-east1. Later on, we will need to deploy a Kubernetes cluster to the subnet. To ensure they are in the same region, run the following to configure the default zone (e.g. us-east1-b) in the Cloud Shell:
gcloud config set compute/zone us-east1-b
Useful documentation: Set default region and zone in your local client | Compute Engine Documentation
Task 1: Create a custom security role
You will create a new custom IAM security role called orca_storage_update in this task. The custom role needs to include the permissions necessary to add and update objects in Google Cloud Storage buckets.
Hints: Review the lab GSP190 IAM Custom Roles on Qwiklabs. You can also read Creating a custom role in the Cloud IAM Documentation.
The following steps show how to create a custom role using a YAML file:
- Create a YAML file in the Cloud Shell environment.
-
Copy the following to the YAML file.
title: "Edirca Storage Update" description: "Add and update objects in Google Cloud Storage buckets" includedPermissions: - storage.buckets.get - storage.objects.get - storage.objects.list - storage.objects.update - storage.objects.create -
Run the following command to create the custom role using the definition in the YAML file.
gcloud iam roles create orca_storage_update \
   --project $DEVSHELL_PROJECT_ID \
   --file role-definition.yaml
Tips: To learn more, read the details about gcloud iam roles create in the Cloud SDK Documentation.
Task 2: Create a service account
This task only requires you to create a new service account named orca-private-cluster-sa.
Run the following command line in the Cloud Shell:
gcloud iam service-accounts create orca-private-cluster-sa \
   --display-name "Orca Private Cluster Service Account"
Useful documentation:
- GSP199 Service Accounts and Roles: Fundamentals | Qwiklabs
- Creating a service account | Cloud IAM Documentation
gcloud iam service-accounts create| Cloud SDK Documentation
Task 3: Bind a custom security role to a service account
Tips: Read about gcloud projects add-iam-policy-binding in the Cloud SDK Documentation.
The lab requires you to bind these three built-in roles to the service account:
roles/monitoring.viewerroles/monitoring.metricWriterroles/logging.logWriter
Run the following to bind them to orca-private-cluster-sa:
gcloud projects add-iam-policy-binding $DEVSHELL_PROJECT_ID \
   --member serviceAccount:orca-private-cluster-sa@$DEVSHELL_PROJECT_ID.iam.gserviceaccount.com --role roles/monitoring.viewer

gcloud projects add-iam-policy-binding $DEVSHELL_PROJECT_ID \
   --member serviceAccount:orca-private-cluster-sa@$DEVSHELL_PROJECT_ID.iam.gserviceaccount.com --role roles/monitoring.metricWriter

gcloud projects add-iam-policy-binding $DEVSHELL_PROJECT_ID \
   --member serviceAccount:orca-private-cluster-sa@$DEVSHELL_PROJECT_ID.iam.gserviceaccount.com --role roles/logging.logWriter
Also, bind the custom role orca_storage_update created in Task 1 by running the following command:
gcloud projects add-iam-policy-binding $DEVSHELL_PROJECT_ID \
   --member serviceAccount:orca-private-cluster-sa@$DEVSHELL_PROJECT_ID.iam.gserviceaccount.com --role projects/$DEVSHELL_PROJECT_ID/roles/orca_storage_update
Task 4: Create and configure a new Kubernetes Engine private cluster
The new Kubernetes Engine cluster needs to fulfill the following requirements:
- The cluster must be called
orca-test-cluster - The cluster must be deployed to the subnet
orca-build-subnet - The cluster must be configured to use the
orca-private-cluster-saservice account. - The private cluster options
enable-master-authorized-networks,enable-ip-alias,enable-private-nodes, andenable-private-endpointmust be enabled.
Hints: Review the lab GSP178 Setting up a Private Kubernetes Cluster on Qwiklabs. If you want to practice with command-line tools, take a look at the detail about gcloud container clusters create in the Cloud SDK Documentation.
-
Navigate to Compute Engine in the Cloud Console, note down the Internal IP address of the
orca-jumphostinstance.Alternatively, you can use the following command to obtain the IP address:
JUMPHOST_IP=$(gcloud compute instances describe orca-jumphost \
--format='get(networkInterfaces[0].networkIP)')
To learn more, read about Locating IP addresses for an instance in the Compute Engine Documentation.
-
Navigate to VPC network in the Cloud Console, note down the IP address range for the regional subnet. You may also lookup the IP range from https://cloud.google.com/vpc/docs/vpc. The IP address for
us-east1is10.142.0.0.SUBNET_IP_RANGE="10.142.0.0/28" -
Run the following
gcloudcommand to create the cluster with the required configurations:gcloud beta container clusters create orca-test-cluster \ --network orca-build-vpc --subnetwork orca-build-subnet \ --service-account=SERVICE_ACCOUNT orca-private-cluster-sa@$DEVSHELL_PROJECT_ID.iam.gserviceaccount.com \ --enable-master-authorized-networks $JUMPHOST_IP/32 \ --master-authorized-networks \ --enable-private-nodes \ --master-ipv4-cidr $SUBNET_IP_RANGE --enable-ip-alias \ --enable-private-endpoint
Task 5: Deploy an application to a private Kubernetes Engine cluster
The last task is to deploy a simple test application hello-server to the Kubernetes Engine cluster. The Cloud Shell cannot directly access the private cluster. So, you have to access it via the jumphost.
- Navigate to Compute Engine in the Cloud Console.
- Click on the SSH button for the
orca-jumphostinstance. -
In the SSH window, connect to the private cluster by running the following:
gcloud container clusters get-credentials orca-test-cluster --internal-ip -
Deploy the
hello-serverto the private cluster using the followingkubectlcommand:kubectl create deployment hello-server --image=gcr.io/google-samples/hello-app:1.0 -
Finally, run the following to expose the application using a load balancer service with mapping from port 80 to 8080:
kubectl expose deployment hello-server --name orca-hello-service \
   --type LoadBalancer --port 80 --target-port 8080
Useful documentation: Using kubectl expose to create a Service | Kubernetes Engine Documentation
Congratulations! You completed this challenge lab.
Demonstration Video
This browser does not support the YouTube video player. Watch on YouTube
00:00 Overview & Challenge scenario
00:47 Inspect provisioned resources
01:12 Set default zone according to the region of orca-build-subnet
01:26 Task1: Create a custom security role called `orca_storage_update`
02:44 Task2: Create a service account called `orca-private-cluster-sa`
03:13 Task3: Bind a custom security role to a service account
05:01 Task4: Create and configure a new Kubernetes Engine private cluster
09:07 Task5: Deploy an application to a private Kubernetes Engine cluster
