☁ Use Terraform to Configure Secure RDP using a Windows Bastion Host on GCP

The topic “Configure Secure RDP using a Windows Bastion Host” is from a challenging lab that I took on Qwiklabs (here is the link to the lab). It was a tricky one that I failed and did a few times of retakes to accomplish it. If you face the same challenge, I hope this blog article would help you. I will share my codes with you for your reference.
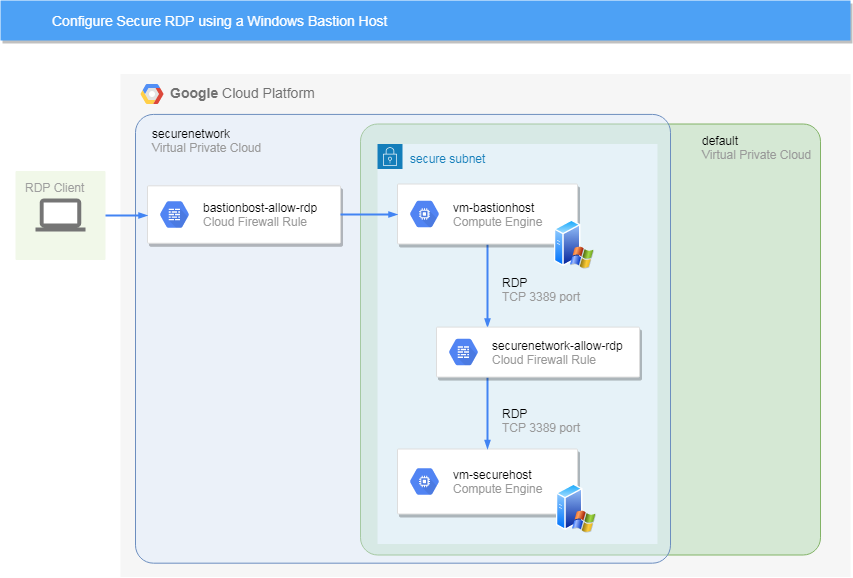
Qwiklabs has over 400 hands-on labs and is a great online self-paced learning Google Cloud Platform (GCP). Most exercises on Qwiklabs provide clear step-by-step instructions for you to follow and finish the labs, except a few Advanced Challenge Labs. Those labs are not easy because they do not offer the “cookbook” steps. You have to figure out the solutions by yourself as the exercises for students who prepare for the Google Cloud Certified Professional Cloud Architect. The lab GSP303 “Configure Secure RDP using a Windows Bastion Host“ is one of the challenge exercises.
Brief Introduction of Challenge Scenario
When you open the page of this lab on Qwiklabs, you can find the task requirements by click the green activity tracker (on the top right of the page) to expand the score box.

The screenshot above shows that there are six steps required for completing this lab. Combining with the instruction details, they are translated to the following mission statements.
-
Create a new non-default VPC called
securenetwork. -
Create a new non-default subnet within
securenetwork. -
Configure a firewall rule that allows TCP port 3389 traffic ( for RDP ) the internet to the bastion host called
vm-bastionhostusing network tags. -
Create a Windows 2016 server instance
vm-bastionhostby applying the above firewall rule. -
Create a Windows 2016 server instance called
vm-securehostthat does not have a public IP address. -
The
vm-securehostis running Microsoft IIS web server software.
This browser does not support the YouTube video player. Watch on YouTube
You can manually create and configure the cloud resources using the GCP console, but Terraform is a more robust approach to deploy the solution automatically with appropriate declarative configuration files.

Deploy the infrastructure on GCP with Terraform
If you are not familiar with Terraform, I recommend you learn or practice the Quest “Managing Cloud Infrastructure with Terraform“ before getting started.
Verifying Terraform Installation
In your GCP project, launch a Cloud Shell to run the following scripts to download and set up Terraform.
# Check the current Terraform version
terraform --version

# Download Terraform
wget https://releases.hashicorp.com/terraform/0.11.11/terraform_0.11.11_linux_amd64.zip

# Unzip Terraform
unzip terraform_0.11.11_linux_amd64.zip

# Set the PATH environmental variable to Terraform binaries:
export PATH="$PATH:$HOME/terraform"
cd /usr/bin
sudo ln -s $HOME/terraform
cd $HOME
source ~/.bashrc

# Create a directory for your Terraform configuration
terraform --version
Create Terraform Configuration Files
Make a new directory for your Terraform configuration with,
mkdir tfnet
cd tfnet
Create a new file called provider.tf and copy the code below into the file,
provider "google" {}
Configurations for the non-default VPC securenetwork and its subnet and firewall rules
Create a new file called securenetwork.tf and copy the following into the file,
# Create the securenetwork network
resource "google_compute_network" "securenetwork" {
name = "securenetwork"
auto_create_subnetworks = "false"
}

# Add a subnet to securenetwork
# Add subnet to the VPC network.

# Create subnet subnetwork
resource "google_compute_subnetwork" "securenetwork" {
name          = "securenetwork"
region        = "us-central1"
network       = "${google_compute_network.securenetwork.self_link}"
ip_cidr_range = "10.130.0.0/20"
}

# Configure the firewall rule
# Define a firewall rule to allow HTTP, SSH, and RDP traffic on securenetwork.

resource "google_compute_firewall" "bastionbost-allow-rdp" {
name = "bastionbost-allow-rdp"
network = "${google_compute_network.securenetwork.self_link}"
target_tags = ["bastion"]
allow {
    protocol = "tcp"
    ports    = ["3389"]
  }
}

resource "google_compute_firewall" "securenetwork-allow-rdp" {
name = "securenetwork-allow-rdp"
network = "${google_compute_network.securenetwork.self_link}"
source_ranges = "10.130.0.0/20"
allow {
    protocol = "tcp"
    ports    = ["3389"]
  }
}

# Create the vm-securehost instance
module "vm-securehost" {
  source           = "./securehost"
  instance_name    = "vm-securehost"
  instance_zone    = "us-central1-a"
  instance_tags = "secure"
  instance_subnetwork = "${google_compute_subnetwork.securenetwork.self_link}"
}

# Create the vm-bastionhost instance
module "vm-bastionhost" {
  source           = "./bastionhost"
  instance_name    = "vm-bastionhost"
  instance_zone    = "us-central1-a"
  instance_tags = "bastion"
  instance_subnetwork = "${google_compute_subnetwork.securenetwork.self_link}"
}
Configurations for the instance vm-securehost
- Make a new directory called
securehost. - Create a new file called
main.tfinside thesecurehostdirectory, and copy the following into the file,
# Code inside securehost/main.tf
variable "instance_name" {
  }
variable "instance_zone" {
  default = "us-central1-a"
  }
variable "instance_type" {
  default = "n1-standard-1"
  }
variable "instance_subnetwork" {
}
variable "instance_tags" {
  }

resource "google_compute_instance" "vm_instance" {
  name         = "${var.instance_name}"
  zone         = "${var.instance_zone}"
  machine_type = "${var.instance_type}"
  tags = ["${var.instance_tags}"]
  boot_disk {
    initialize_params {
      image = "windows-cloud/windows-2016"
    }
  }
  network_interface {
    subnetwork = "${var.instance_subnetwork}"
  }
  network_interface {
    subnetwork = "default"
  }
}
Configurations for the instance vm-bastionhost
- Make a new directory called
bastionhost. - Create a new file called
main.tfinside thebastionhostdirectory, and copy the following into the file,
# Code inside bastionhost/main.tf
variable "instance_name" {
  }
variable "instance_zone" {
  default = "us-central1-a"
  }
variable "instance_type" {
  default = "n1-standard-1"
  }
variable "instance_subnetwork" {
}
variable "instance_tags" {
  }

resource "google_compute_instance" "vm_instance" {
  name         = "${var.instance_name}"
  zone         = "${var.instance_zone}"
  machine_type = "${var.instance_type}"
  tags = ["${var.instance_tags}"]
  boot_disk {
    initialize_params {
      image = "windows-cloud/windows-2016"
    }
  }
  network_interface {
    subnetwork = "${var.instance_subnetwork}"
    access_config {
      # Allocate a one-to-one NAT IP to the instance
    }
  }
  network_interface {
    subnetwork = "default"
  }
}
Deploy the Terraform Configuration
Use the following codes to initialize and apply the Terraform to build the infrastructures,
terraform fmt
terraform init
terraform plan

terraform apply
After the cloud infrastructure deployed to your GCP project, you need to install IIS in Windows 2016 Server inside the instance vm-securehost to finish the lab. You can follow this installation guide https://www.rootusers.com/how-to-install-iis-in-windows-server-2016/.
Congratulations! You should accomplish the lab if you follow all the above steps.
This post has also been published to Medium. If you like to read and take notes in Medium, please visit Medium (@chriskyfung).
Next lab, you will be examined the skills for building and deploying a containerized application with Docker and Google Kubernetes Engine.
See Also:
