☁ Deploy a Compute Instance with a Remote Startup Script | logbook


If you read my last post, you should know how to manually create a VM instance and configure it as an Apache2 web server with the web console in Google Cloud Platform (GCP). The steps are easy but you can automate and scale your web server installation process by adopting a Startup Script. Loading the startup script remotely from a cloud storage bucket is one method. The second lab of the challenge quest, GSP301 “Deploy a Compute Instance with a Remote Startup Script“, is to test if you can deploy an Apache server to a VM instance with a remote startup script. You must know how to create a bucket and upload files to Google Cloud Storage, and configure the metadata in the dialog of creating an instance.
Brief Introduction of Challenge Scenario
When you open the page of this lab on Qwiklabs, you can find the task requirements by click the green activity tracker (on the top right of the page) to expand the score box.
The screenshot above shows that there are 4 steps required for completing this lab. Combining with the instruction details, they are translated to the following mission statements.
-
Create a Google Cloud Storage bucket, and confirm that the bucket contains a file.
-
Create a Linux virtual machine that runs a remote startup script called
install-web.shfrom cloud storage. -
Confirm that an HTTP access firewall rule exists with tag that applies to that virtual machine.
-
Confirm the web server can be connected using HTTP and get a non-error response.
Download Sample Startup Script
First of all, find Sample Startup Script below the Start button and the timer of the lab. Then, download the startup script file to your computer. This lab requires a minute for provisioning lab resources. You may make use of this interval to download the file or take a drink.
Upload the Startup Script to a Cloud Storage Bucket
- In the web console, navigate to Storage.
- Create a bucket with a unique bucket name.
- Upload the
install-web.shfile to the bucket. -
Make the file publicly accessible (This ensures the file can be accessed by the VM instance deployed soon).
Click the three dots () icon at the right end of the filename. Choose Edit permissions in the dropdown menu.
Add a new User, type
allUsersto the name field, and choose Reader. -
Click the filename and copy the URL, i.e.
gs://.../install-web.shfor later use.Confirm the startup script file become pubilcly accessible
Configure Metadata in Creating VM instance
-
Go to Compute Engine, create a new VM instance.
-
Select
Allow HTTP trafficunder the Firewall section. -
Expand Management, security, disks, networking, sole tenancy.
-
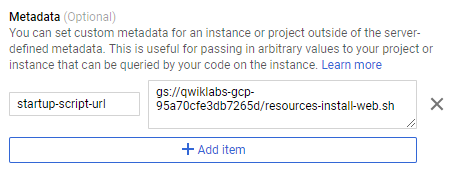
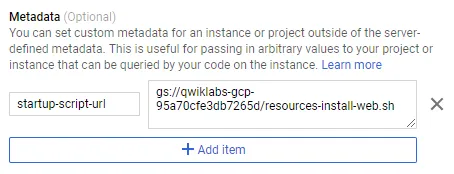
In the Metadata section, add
startup-script-urland paste the URL of the script file as the key value.If you want to learn more, please refer Running Startup Scripts in Compute Engine Documentation.
-
Click Create to create the instance.
The new Compute Engine, `instance-1`
Inspect Instance Correctly Running Startup Script
-
Wait for the new VM instance startup.
-
Click the instance name to open its Details tab. Then, expand the Logs and click Serial port 1 (console).
-
The startup script automatically installs the Apache web server software while creating the VM instance. You should able to find the log events about downloading the startup script and installing the apache packages.
Logs that shows the execution of the startup script -
Open the external IP in your web browser. You should view the Apache default page if the startup script has been successfully executed.
The Apache web server installed by the startup script
Congratulations! You should accomplish the lab if you follow all the above steps.
This post has also been published to Medium. If you like to read and take notes in Medium, please visit Medium (@chriskyfung).
With the GCP web console, you can to set up a VM instance as a web server without touch any codes. In this lab, you also automate the installation of web server packages using a startup script. But if you need to repeatedly deploy cloud resources more systematically, you go for Cloud Deployment Manager. Next lab tests your proficiency of building a deployment template for creating a VM instance with the appropriate firewall rule for HTTP traffic.
See Also: